First project with logiccloud
This tutorial shows you how to create your first project with logiccloud, deploy it on a logiccloud Control as a Service Runtime and access it via the Web HMI.
As an example project, we create a counter that counts up on each call and outputs the value in the HMI.
Create project structure
A tutorial on how to create projects can be found here: Create and manage projects
Descriptions of the individual project elements can be found here: Project elements
POU
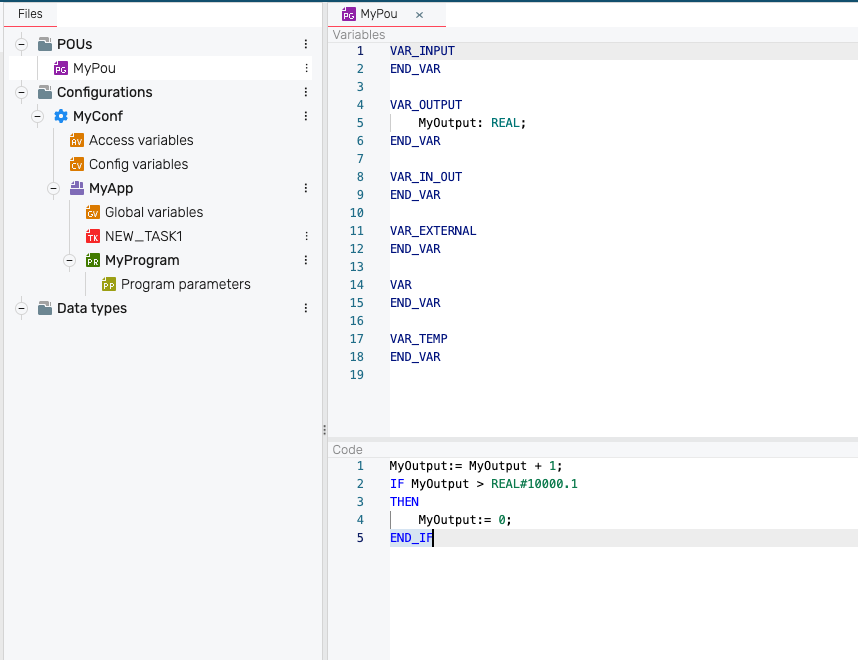
First, we create a new POU. We give this the name MyPou, select as POU Type Programand as Language Structured text (ST).
For the variables we only need an output of type REAL.
VAR_OUTPUT
    MyOutput: REAL;
END_VAR
For the counter we now need the following code. Each time it is called, it increments the counter by 1 and once the value reaches 10000, we reset it back to 0.
MyOutput:= MyOutput + 1;
IF MyOutput > REAL#10000.1
THEN
    MyOutput:= 0;
END_IF
Configuration
Next we need to create the configuration. To do this, we create a new configuration with the name MyConf
We rename the application New_APP1 to MyApp .
We rename the program NEW_PROGRAM1 to MyProgram .
Access Variable
In order for MyOutput to be included in the HMI, we need to map it with an Access Variable. To do this, we create a new Access variable with the following values:
HMI enabled: trueName: MyAccessOutputPath: MyApp.MyProgram.MyOutputType: REALWritable: true
The path for the access variable is composed of the name of the application MyApp, the name of the program MyProgram, and the variable from the POU MyOutput .
Program
We rename the program NEW_PROGRAM1 to MyProgram . At Program name we enter the POU MyPou that we created earlier.
That would be the end of our first program. Next, we move on to the HMI.
HMI
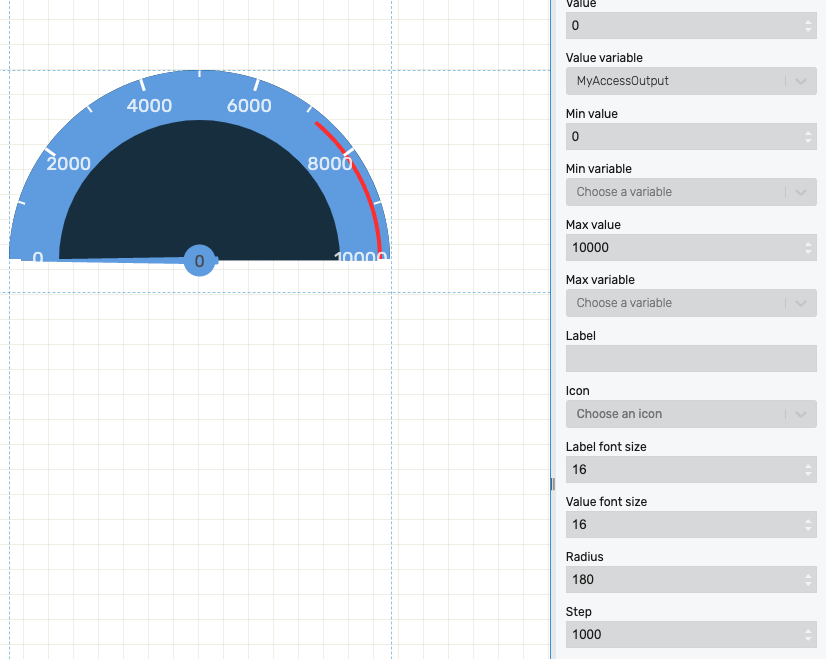
In HMI Builder we can now create our HMI. We take a gauge and configure the following values:
Value variable: MyAccessOutputMax value: 10000Step: 1000
Create build
Now we have created our project elements as well as the HMI and can compile the project. To do this, we navigate back to IDE and press the green arrow at the bottom of the terminal at Build.
Once the build is complete, we will see green check marks by each stage in the terminal.
We can now see the build at Builds .
Create Control as a Service Runtime
At Runtimes we can now start our compiled project. To do this, we need to create a new runtime.
First, we select the build we just created.
As name we take MyRuntime. The description is optional.
For Platform we select AMD64 , for Configuration MyConf and for Resource MyApp.
Tags are optional and can be assigned as desired.
Once the runtime is created, we can launch it. Using the link Open HMI we can view the created visualization.